Monday, December 10, 2012

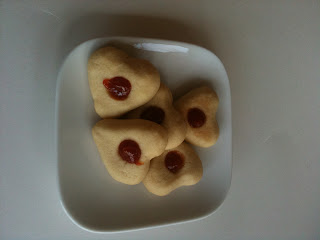
Dulce de Leche Sugar Cookies

Hi all! December is here and surely I just LOVE December, I LOVE Christmas and the smell of the pine Christmas tree, Love the cookie baking, the gift giving and most important the birth of our Savior, Jesus Christ!!

Cookie baking has become an obsession for me! When I see all the different, wonderful, artistic and colorful decorated cookies posted all over facebook, I just drool over them. Oh gosh, most of them I cant even dream of trying to make them :( These ladies are soooo talented! During all that cookie obsession I have now I try new recipes and here is one I just love and came out perfect the first time I tried it. Please try it out and let me know what you think!


Dulce de Leche sugar cut out cookies  

2 sticks of butter
1 c of sugar 
1 egg
1 tsp Butter Vanilla emulsion 
1/4 c of Dulce de Leche ( I used homemade)
3 1/2 c of All Purpose Flour
2 tsp baking powder

Cream Butter and Sugar until change of color, add in the Dulce de Leche and mix well. Add egg and beat until combined. Now add in the emulsion and mix. Slowly mix in the flour and B. powder until cant see the flour. If the mixture is too soft just add a little more. Remove and make a ball with it and wrap with plastic wrap and refrigerate for 1hr. When its cold roll and cut as desired. bake at 350 for 8-10 or til edges are golden. Let cool well and decorate has desired with Royal Icing. 


These are my naked Dulce de Leche sugar cookies


Hope you can enjoy this recipe which I consider very tasty infact to me it tasted like shortbread but with a little more consistency and less fragile.


If you have any questions or doubt, just leave your questions or comments, I would Loooove to here them. 

Love, Victoria!   

Saturday, September 15, 2012

Pumpkin Pie Spice Sugar Cookies


Cookies, Cookies, Cookies! Oh yeah Cookies! 

I just found out I'm a cookie decorator. Noooo I'm a cookie freak. How did I found this out?? Well recently someone posted on Facebook a list of actions that meant that you'r a cookie decorator  if you could identify your self with them,  but the one that really convinced me was that if everything you see, you imagine you can turn it into a cookie. Yupp thats me!
Even thou I'm not a good cookie decorator, I'm in love with it!!  And since the best season is falling in I wanted to make something with that special touch for this season.
Pumpkin Pie spice sugar cookies, Ohhhh and these were soo good specially when iced.  Delicious, yeah thats the word for them.


Love the color they have! Its a nice tangy orange color. 
Covered with fondant

Please give them a try they are really awesome!!

Pumpkin Pie Spice Sugar Cookies:

1 stick of butter
1/2cup granulated sugar
1 egg
1/4 cup Pumpkin
1 tsp vanilla extract 
1 tbsp Pumpkin pie spices
1 tsp baking Powder 
11/2 to 2 cups of All Purpose Flour( add more if needed)

Beat butter and sugar as usually. Add egg and pumpkin. Beat only until mixed. Add extract and spices. Slowly add baking powder and flour. If the mixture is too moist just add a little more flour. Wrap with plastic wrap and refrigerate 2hrs or overnight. Roll out, cut and freeze for 10 mins. Bake at 350F for 8-10 mins. Since I like them a little crispier I left them a little longer. 

Let cool. And decorate as you like.  Enjoy!!

                                                                   Decorated with RI

I love to receive your coments and questions, so please dont hesitate to do sooo! Bless you all!


Sunday, July 15, 2012

Fresh Fruit Tart! Yummmmm!


Today is a lovely Sunday, and after church I had decided to just relax since I had been very busy this week and today was my day off from my new exercise routine. Yeah exercise, not my favorite thing but trying to get back at it after a few years of being lazy and as a consequence the gaining of almost 30 pounds and that isnt funny. But that's another story.

 Soooo yes I was relax seeing a movie on my laptop when just got bored and sad HHHHaaa let me make something sweet for the kids.  Went straight to my recipe book and looked thru it and say its been like 3 years I havent made a fruit tart! It seemed like a great idea knowing that its made with fresh fruit and sound sooo refreshing and the best part it wouldn't hurt my diet since it was made with fresh fruit, Right!!!!

 Lets make it!

Recipe:
Crust:
1/2 cup confectioners sugar
1 1/2 cups all-purpose flour
1 1/2 sticks unsalted butter

Filling:
1 (8onz) package cream cheese
1/2 cup granulated sugar
1 teaspoon vanilla extract (I used vanilla bean paste)

Topping:
Fresh Fruit (any you like, may be strawberries. kiwis, blueberries, raspberries, etc.

Whipped cream (optional) for garnish

Preheat oven to 350 degrees F.

For Crust: in food processor or your kitchen aid machine combine confectioners sugar, butter and flour til it forms a ball.

 With fingers press dough into the 12 inch tart pan with removable bottom. Push the dough into indentations and sides.

 Bake for about 10-12 min. Remove from oven and let cool completely.

In another bowl beat together cream cheese, granulated sugar and vanilla until creamy. Once the crust is completely cool just add the filling to it and garnish with the fresh fruits.

Oh Gosh, this really is a very fast, simple and awesome dessert to make at anytime.

There goes my diet :0 !! Hope you enjoy it as much as I did and it was delissssssh!!

Tuesday, June 5, 2012

Gum paste Margarita flower Tutorial


I L  O V E tutorials! But specially if they are made by other bloggers, maybe because I'm a little lazy you might say ;) .  Please omit the lazy part, not a very nice thing to say about my self. ;)  Here I made a gum paste margarita which are sooo easy to make and they look beautiful on cupcakes, as cake toppers and if you make them smaller you can use them on mini cupcakes, petite fours and even cake pops.

Material Needed:
Gum paste (the colored desired)
roller
Margarita cutter
small powder sugar bag ( made out of handi wipes)


As you can see in the photo I took a piece of gum paste and massaged it and powdered some of the sugar that is in the small handi wipe pouch on the table so the gum paste do not stick to the table when rolled out.  Roll out the gum paste and with the margarita cutter just cut it out.


 After cutting out the margarita just lay it on flower mold or on apple cartons that are round and big just like this foam mold.
Now while its drying just take another small piece of paste and color it the color you desire your center to be.  Roll out a small ball and with a small spatula make crisscross lines on it and let it dry. 


You can make it with double petals by making 2 and glue them together and they would look like this...
I love this margaritas and you can make them in all sizes and colors. Below I posted the recipe I use for my flowers, if you have any questions just leave a mi a comment or email me.
Please leave your comments I love to read them and they really help me to modify and make my not very experience blogging better. Thank you all.


Rapid Gum Paste 
Materials:
1 egg white (large)
1 1/2 cup of powder sugar (10x)
3 teaspoons of Tylose powder
1 tsp of Crisco for hands

Beat egg white a bit with mixer and then add powdered sugar and make like a medium soft royal icing then add the tylose and beat just a little.  You'll see the difference because it will turn stiffer. Remove from mixer and pour some more sugar on table and scrape out the mass from the bowl. Put some crisco on hands so the mass does not stick to your hands while massaging.   Keep massaging and adding powdered sugar until it does not stick to table or hands. After finishing put it in a plastic bag or zip lock bag and store in the fridge for 24hrs and when not using so it doesn't dry out.

Hope you enjoy this tutorial and please let me know how it turned out for you. Happy flower making!! :))


Friday, May 4, 2012

Cheese and Vanilla Bean Pound Cake with Almond Glaze

Hi Everybody! After a few weeks of busy work I'm back and with this awesome pound cake. It has cheese in it and its sooo moist, Oh God I would just eat another slice. Well there goes my diet again! ;(  This recipe came from a little girls story book, where a young lady tell a story about her grandma teaching her how to bake and this recipe was on the end of the story. So I decided to try it out and its a really good and super easy cake to make, even little girls can make.


Cheese and Vanilla Bean Pound Cake with Almond Glaze:

8 onz  Cream Cheese
2 sticks  Butter
2 cups Sugar
6 eggs
2 cups cake flour with baking powder
2 tsp vanilla bean paste


Glaze

2 cups Powdered sugar
2 tsp water
1 tsp almond flavor or extract


Cream the cheese and butter together. Then add sugar and beat until fluffy. Add 3 eggs first but one at the time and save the other 3 for after the flour. Add vanilla beat.  Mix in the flour 1 cup at a time, do not over beat. Now add the last 3 eggs one at a time. I used a bundt cake pan. So... butter or grease your pan and fill it with the batter. Bake at 350F for about 35mins. I took it out of the oven when the toothpick almost came out clean but left it in the pan a while longer. It came out awesome and so moist.

When it was cool I placed it on a dish and made my glaze.
Mix the sugar powder with the water and flavoring, if its to runny just add more sugar and if its to stiff just add a little more water, depending on your taste.


Would love to hear your comments, please post them below. Have fun and Enjoy, Its great!

Thursday, April 12, 2012

Chocolate Chip Cookies Mania Part 4

Last of our chocolate chip cookie Mania recipe , hope you like it! 

Cakey Chocolate Chip cookies

Makes about 12 large cookies
3 ¾ cups cake flour
2 tbsp cornstarch
1 tsp kosher salt
¾ tsp baking powder
½ tsp baking soda
2 sticks  cold butter
1 ¼ cups packed light brown sugar
½ cup granulated sugar
2 large eggs
1 ½ cups semisweet chocolate chips

Whisk flour, cornstarch, salt, baking powder and baking soda. Beat the butter and sugars until combined but slightly lumpy.  Do not overbeat. Beat in the eggs one at a time. Reduce the mixer speed to low add the flour mixture in batches and beat until combined.  Stir in the chips by hand. Press plastic wrap on to dough and refrigerate for at least 2 hrs or overnight.


Preheat oven to 375F. Line baking pans with parchment paper and drop cookie mix 2 inches apart. Bake for about 10-12 mins or until lightly golden brown at the edges. Let cool completely and enjoy!!

Wednesday, April 11, 2012

Chocolate Chip Cookies Mania Part 3

Crispy-Cakery Chocolate Chip Cookies
These are wonderful, give them a try and see if these can be your favorite!

Makes about 36 cookies

2 ¼ cups all-purpose flour
1 ¼ tsp salt
¾ tsp baking soda
2 sticks unsalted butter
¾ cups packed light brown sugar
¾ cup granulated sugar
2 large eggs
2 tsp vanilla extract
2 cups semisweets chocolate chips

Whisk the flour, salt and baking soda in a large bowl.  Beat the butter, brown and granulated sugar on medium speed until light and fluffy about 5 mins.  Beat in the eggs one at a time. Add the vanilla and beat . Reduce speed and add flour mixture .  Beat in chips by hand.  Press plastic wrap directly onto dough and refrigerate for at least 1 hr. 

Preheat oven to 425F, line baking sheets and drop by spoon about 2 inches apart.  Bake until golden brown  around edges but still light in the center, about 8 mins.  Remove from oven and let cool.

Monday, April 9, 2012

Chocolate Chip Cookie Mania 2!!!

Hi!! Here are the best Crispy  Chocolate Chip Cookies! Enjoyyyyy!!

Makes aprox. 36 cookies

1 ½ cups All Purpose Flour
1 tsp Kosher salt
1 tsp baking soda
1 stick unsalted butter, softened
¼ cup vegetable oil
1 cup superfine sugar
¼ cup packed dark brown sugar
1 tsp vanilla extract
2 large eggs
1 ½ cups semisweet chocolate chips

Preheat oven to 350F. Line 2 baking sheets with parchment paper. Whisk the flour, salt and baking soda in a medium bowl.  Beat butter, veg oil, sugar and brown sugar in a bowl until creamy, about 5 mins The mixture will look a bit separated at this point. Beat in 1 tsp water and the vanilla until smooth. Reduce the mixer speed to low and beat in the eggs one at a time until just incorporated, do not overbeat.  Beat in the flour mixture until just combined. Stir in the chocolate chips by hand.
Drop by tablespoons on to pans 3 inches apart. Bake until deep golden brown,  about 20mins, rotating the baking sheet halfway through.  Remove the cookies from oven and let cool. 

Sunday, April 8, 2012

Chocolate Chip Cookie Mania!!!

     I dont know you but I'm a Chocolate Chip Cookie Freak! Yes Freak!! I love them but only homemade ones. I dont like the store bought ones at all! My kids do; they love any chocolate chip cookie.   I prefer the soft hot out of the oven ones, Oh My God! There goes the diet! Not good for my diet, even thinking of them I gain the weight! But thats another story...There are many recipes out there, some great, some good and some not soo good! But I found the best Chocolate Chip Cookie recipe for my taste, maybe not so great for yours. In a recent magazine I bought, I found 4 different recipes for 4 different taste buds and I will be sharing all 4 with you. One each day.  Sooooo go on and try them and discover the one you loveeeee just like I did!! My fave is the first one :

Chewy Chocolate Chip Cookies

Makes about 30 cookies
2 3/4 cups All-purpose Flour
1 tsp salt
1 tsp baking Powder
1 tsp baking soda
2 1/2  Stiicks unsalted butter, softened
1 3/4  cups packed brown sugar
1/4 cup granulated sugar
2 large eggs
2 tsp vanilla extract
2 cups semisweet chocolate chip

Sift the flour, salt, baking soda and baking powder together into a large bowl. Beat the butter, brown sugar and granulated sugar in a bowl with a mixer on medium-high speed until pale and fluffy, about 4 minutes.  Beat in the eggs one at a time, then beat in the vanilla. Reduce the mixer speed to low. Add the flour mixture and beat until combined. Stir in the chips by hand.  Press plastic wrap directly onto the surface of the dough and refrigerate at least 1 hr. Preheat oven to 375F. Line 2 baking sheets with parchment paper and drop heaping tablespoonful of dough onto it. Bake until cookies are golden around the edges but still soft in the middle, about 12 mins.Remove from oven and let cool about 10 mins on the baking sheets then transfer to cooling rack. Enjoy!!
If you have any comment you are sooo welcome to do at the end of this post.

Sunday, February 19, 2012

Shortbread drop cookies with guava filling

Hi! Here in Puerto Rico we have some tradicional candy that are already part of our cultural you may say; like when I was small and lived in NYC, the big Apple and always had candy apples for summer and never could find these in other states so easily, well something like that.  Anyway, well these we love here and they are called "Polvorones" and others call them "mantecaditos" either way they are delish!!!!
This recipe makes about 50  small pieces.

Polvorones:

1/2 cup Butter
1/2 cup Crisco
1 tsp vanilla extract
1/2 cup sugar
2 cups of All Purpose flour

Beat together the butter and Crisco with electric mixer, Cream well. Add sugar gradually and beat for 2min aprox. Then add in vanilla and slowly the flour cup by cup and beat until it forms a ball like mass. Refrigerate for 30 mins or I just put it in the freezer for 10 min if I'm in a rush, like always. Take out and make little 1" balls (or andy shape) and flatten them buy making a circle with the back end of the tale of the wooden stick. Bake on a cookie sheet with patchment paper for 10-15min on 350F.

Filling:
Guava Paste or any filling you like!

Once baked and cooled some guava paste and cut into pieces and heat in microwave for 20 seconds and when its all melted just fill in the centers. Let cool completely; watch out for burns with the hot guava. These are also sooo good alone or you can just fill them with anything you like! Once again enjoy making and eating!

These were filled with some dark chocolate ganache I had left over from some macarons I had made earlier in the day. Enjoy!!

Red Velvet Macarons with Mascapone cheese and vanilla bean filling

Oh, Macarons, Macarons, Macarons, Macarons.....Everytime I make these they make me sing!! I promised to post the recipe about 2 weeks ago at the fan page at Facebook and Its finallllly here. It was about time I posted it but between my kids and Valentines Day, it has been a total rush in my life lately. Well here we goooo!

Macarons (Basic recipe)

100gr ground Almonds or almond flour
100-110gr egg whites ( about 3 whites aged for 24hrs)
200 gr powdered sugar
1tsp vanilla (or other flavor) subtitute for red velvet flavor
4-5 tbsp of granulated sugar

In a small bowl mix powdered sugar with almonds and process in a food processor for about 30 seg. Always sift them together afterwards and eliminate any lumps.  In Large bowl wisk whites with electric beater and when they start to get foamy add sugar 1 tbsp at a time.  Keep beating until thick and glossy like merengue. At this point add coloring and or extract. Do not over beat. Then fold dry ingredients into merengue slowly using spatula. Fill in piping bag and pipe on patchment paper or silkpat the shape desired; here in this particular recipe I made hearts for valentine and subtituted the vanilla for red velvet flavoring and didnt have to add any coloring because this flavoring is pretty red.  So after piping leave on counter top for about 30-60 mins for it to form the skins on top, you can touch it and see it made the skin and thats the moment to bake.

Preheat oven to 150C and bake for abount 15 mins. I usually just pick one up and if it still sticks to the bottom they need more time.  Ok, some people say to let cool completely but what I do is that I wait 5 mins and start removing them with my small thin spatula, then cool and fill with favorite filling.

Mascapone cheese filling

1- 8onz Mascapone cheese or cream cheese
3/4 stick of real butter
vanilla extract or bean paste
about 2 cups of powdered sugar

Beat cheese and butter well until creamed and add the extract then slowly on low spoon in the sugar little by little. Turn beater up to medium high and beat for about 1 min until well incorporated.

Once your macarons are cooled and your filling reading,  fill a pastry bag and continue to fill and sandwhich your macarons.
This is just the basic recipe I make but you can make variations with the fillings and adding color to them and other extract, etc, their is No limit, just express your self with them and have a great time making and eating them!! After eating one you cant stop!!!!